


Table of contents
- Introduction
- Prerequisites
- Get the starter code
- Install dependencies and set environment variables
- Run the application
- Configuring Twilio credentials and access tokens
- Implement calling placing from application
- Set up TwiMl Webhook
- Webhook to handle outgoing calls
- Creating a Secure Tunnel with Ngrok
- Testing of Application
- What is next for your voice product review system
- Additional resources
Introduction
In the world of e-commerce, businesses are constantly striving to enhance customer experiences and improve their operations. One exciting trend is the integration of voice-enabled technologies to revolutionize the way customers interact with online stores. By leveraging the power of Twilio Voice and Ngrok, businesses can create a cutting-edge voice product rating system that offers a seamless and convenient way for customers to provide feedback using their voice.
In this tutorial, we will guide you through the process of building a voice product rating system using Twilio Voice and Ngrok. We will explore how to set up webhooks, handle incoming calls from customers, process product ratings and feedback, and provide real-time responses. By following this tutorial, you will gain the knowledge and tools necessary to integrate a voice product rating system into your e-commerce platform.
By the end of this tutorial, you will have:
A server capable of receiving incoming voice calls and processing customer ratings and feedback.
Seamless integration with the Twilio Voice API to handle voice communication.
Real-time feedback to customers regarding their product ratings.
A secure tunnel created using Ngrok to expose your local server to the internet.
Let's get started
Prerequisites
To successfully complete this tutorial, you will need the following:
A free Twilio account: To continue with this tutorial, you will need a Twilio free account. By registering through this link, you'll receive $10 in Twilio credit when you upgrade to a paid account.
Node.js (version 14.16.1 or higher): Make sure you have Node.js installed on your machine.
Npm: We will be using npm, the package manager for Node.js, to install and manage dependencies for our server application.
React: Familiarity with React
GitHub: Basic knowledge of Git and GitHub will be useful for version control.
Ngrok: Ngrok will be used to create a secure tunnel to expose your local server to the internet.
Get the starter code
The first step is to choose a spot on your local computer for the project to be installed. To clone the starter code repository, open the terminal and do the following command.
git clone https://github.com/Titre123/Twilio-Ecommerce.git
Install dependencies and set environment variables
We can now install the dependencies now that the starter project is already in a directory on your local computer. To install dependencies, execute the following command.
npm install
After we've installed all of the dependencies that the application will require, let's set the environment variables that our application will require. To copy the .env.example file into .env, use the following command.
cp .env.example .env
Now you have a copy of the .env.example file in the .env file, we can now set the variable defined in the .env file.
In your code editor, open the.env file. This is what your code editor should see.
NODE_ENV = development
PORT =<>
MONGO_URI = <>
JWT_SECRET = <>
PAYPAL_CLIENT_ID= <>
Set the PORT to 8000. The JWT_SECRET will be decided by you and you can get your MONGO_URI from mongo atlas. PAYPAL_CLIENT_ID can be gotten from the paypal developer page.
Run the application
You can now launch the application after installing the dependencies and configuring the environment variables.
Starting the backend server
To start the application's backend, type the following command into the terminal.
npm run server
After running the program, you should see the following log on your terminal.
Server running in development mode on port 8000
MongoDB Connected: ac-zba4w9i-shard-00-01.9yxqrd1.mongodb.net
Starting the frontend application
To launch the frontend. Run the following commands in a second terminal.
cd frontend
The command above will navigate to the frontend directory
npm start
A few minutes after you run the command, your default browser will open up a tab point to the url http://localhost:3000/. The application home page will look like this.
Configuring Twilio credentials and access tokens
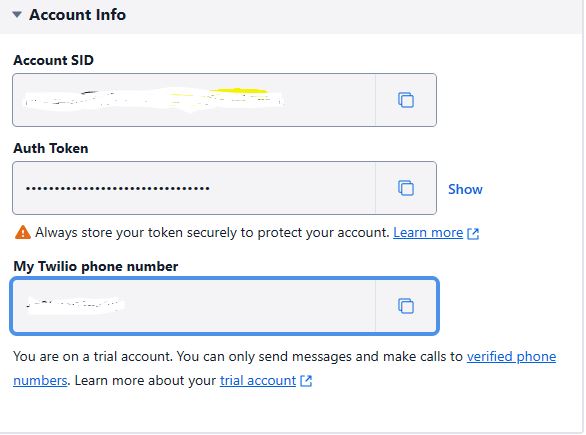
Retrieving Twilio credentials from the Twilio console
Next, log into your Twilio console to retrieve your Twilio credentials, which include your Token, SID, and phone number. These credentials will be stored as environment variables.
Adding Twilio credentials to the .env file
To set up the appropriate environment variables, add the Twilio credentials to your .env file. To launch the frontend. Run the following commands in a second terminal. After running the program, you should see the following log on your terminal.
NODE_ENV = development
PORT = <>
MONGO_URI = <>
JWT_SECRET = <>
PAYPAL_CLIENT_ID = <>
TWILIO_TOKEN = <>
TWILIO_SID = <>
TWILIO_PHONE = <>
Implement calling placing from application
Implement backend to call when a client make an order
Next, create a twilio.js file in the utils directory in your backend directory and copy the following code below inside.
import twilio from 'twilio';
const accountSid = process.env.TWILIO_SID;
const authToken = process.env.TWILIO_TOKEN;
const phoneNo =process.env.TWILIO_PHONE;
const client = twilio(accountSid, authToken);

export default async function makeCall(twimlUrl, recipient) {

try {
    const call = await client.calls.create({
        url: twimlUrl, // URL for your TwiML
        to: recipient, // The recipient's phone number
        from: phoneNo // Your Twilio phone number
    });

    console.log('Call SID:', call.sid);
} catch (error) {
    console.error('Error:', error.message);
    }
}
The code above set up twilio in the backend. It imports the Twilio package and set client up with the accountSid and authToken. makeCall function calls the recipient from the Twilio phone number.
Implementing the call placing logic in backend
Next, import the makeCall function and call the function when an order is created.
Navigate to the orderController.js in the controller directory and import the makeCall function below import Order from '../models/orderModel.js'
import makeCall from '../utils/twilio.js'
import User from '../models/userModel.js'
Update the addOrderItems function in orderController.js to call the makeCall function after order has been created.
/ @desc    Create new order
// @route   POST /api/orders
// @access  Private
const addOrderItems = asyncHandler(async (req, res) => {
const {
    orderItems,
    shippingAddress,
    paymentMethod,
    itemsPrice,
    taxPrice,
    shippingPrice,
    totalPrice,
} = req.body

// Check if there are order items

if (orderItems && orderItems.length === 0) {
    res.status(400)
    throw new Error('No order items')
    return
} else {
    const order = new Order({
    orderItems,
    user: req.user._id,
    shippingAddress,
    paymentMethod,
    itemsPrice,
    taxPrice,
    shippingPrice,
    totalPrice,
})
const user = await User.findById(user);
// Save new order to the database
const createdOrder = await order.save()
await makeCall(‘', user.phoneNumber)
res.status(201).json(createdOrder)
}
})
Set up TwiMl Webhook
Select a location in your local computer that you want to set up the webhook project. Open the terminal and run the following command to clone the webhook starter repository to your local computer.
git clone https://github.com/Titre123/webhook.git
Install dependencies for webhook
Now that the starter project is already in a directory in your local computer, we can now install the dependencies. Run the following command to install dependencies.
npm install
Run the webhook
After you have installed the dependencies, you can now run the webhook. Run the following command in the terminal to start the webhook.
npm run dev
Create a .env file and define a TWILIO_ACCOUNT_SID environment variable.
You should see the following log on your terminal a few seconds after running the command.
Server running on port 4000
Webhook to handle outgoing calls
Set up utility functions
Next, navigate to the utils.js file, just below the import statement, add the following functions.
const jwt = require('jsonwebtoken');
const axios = require('axios');
const generateTokenWithPhoneNumber = (phoneNumber) => {
    return jwt.sign({ phoneNumber }, process.env.JWT_SECRET, { expiresIn: '30d' })
}
const generateToken = (id) => {
    return jwt.sign({ id }, process.env.JWT_SECRET, { expiresIn: '30d' })
}
async function getUserByPhoneNUmber(phoneNumber) {
    let response;
    const token = generateTokenWithPhoneNumber(phoneNumber);
    try{
        response = await axios.get(`http://localhost:8000/api/users/phone/${phoneNumber}`, {
        headers: {
        Authorization: Bearer ${token}
        }
    });
    console.log(response.data);
    return response.data._id;
    } catch (error) {
        console.error('API request failed:', error.message);
        throw error;
    }
}
async function createToken(phoneNumber) {
    const id = await getUserByPhoneNUmber(phoneNumber);
    const token = generateToken(id);
    return token;
}
async function callOrderProduct(orderId, phoneNumber) {
    let response;
    const token = await createToken(phoneNumber);
    try {
        response = await axios.get(`http://localhost:8000/api/orders/${orderId}`, {
        headers: {
            Authorization: Bearer ${token}
        }
    })
    return response.data.orderItems;
    } catch (error) {
        console.error('API request failed:', error.message);
        throw error;
    }
}
async function reviewProduct(productId, phoneNumber, rating, feedback) {
    let response;
    const token = await createToken(phoneNumber);
    const requestBody = {
    rating,
    feedback
    // Add more properties as needed
    };
    try {
        response = await axios.post(`http://localhost:8000/api/products/${productId}/reviews`, requestBody, {
        headers: {
            Authorization: Bearer ${token}
        },
    })
    return response.data;
    } catch (error) {
        console.error('API request failed:', error.message);
        throw error;
    }
}
generateTokenWithPhoneNumber generates a token using the phone number. generateToken generates a token using user id. getUserByPhoneNUmber gets a user from the database based on the phone number calling. createToken generates the token that we will use to query the backend. callOrderProduct gets an order based on the orderId provided. reviewProduct reviews a product with the productId.
Export callOrderProduct and reviewProduct in the utils.js. To export, add the following export statement below the reviewProduct function.
module.exports = {
    callOrderProduct, reviewProduct
}
Create webhook routes to make calls.
Next, navigate to the app.js and add the following post routes below app.use(express.urlencoded({ extended: true }));
app.post('/twiml', (req, res) => {
const twiml = new twilio.twiml.VoiceResponse();
const phoneNumber = req.body.phoneNumber;
const orderId = req.query.orderId;
twiml.say(
{ voice: 'alice' },
'Welcome to the Product Review System. Would you be willing to review the products in your recent order? Press 1 to accept or press 2 to reject.'
);
twiml.gather({
input: 'dtmf',
timeout: 10,
numDigits: 1,
action: /handle-response?phoneNumber=${phoneNumber}?orderId=${orderId},
method: 'POST',
});
res.set('Content-Type', 'text/xml');
res.send(twiml.toString());
});
app.post('/handle-response', async (req, res) => {
const { Digits } = req.body;
const phoneNumber = req.query.phoneNumber;
const orderId = req.query.orderId;
if (Digits === '1') {
const products = await callOrderProduct(orderId, phoneNumber);
for (const currentProduct of products) {
const twiml = new twilio.twiml.VoiceResponse();
twiml.say(
    { voice: 'alice' },
    Please rate ${currentProduct.name} on a scale of 1 to 5. Press any key to begin.
);
twiml.gather({
    input: 'dtmf speech',
    timeout: 10,
    numDigits: 1,
    action: /handle-rating?phoneNumber=${phoneNumber}&productId=${currentProduct.product},
    method: 'POST',
    numDigitsTimeout: 1,
});

res.set('Content-Type', 'text/xml');

res.send(twiml.toString());

}

} else if (Digits === '2') {
    // End the call if the user rejects reviewing the products
    const twiml = new twilio.twiml.VoiceResponse();
    twiml.say({ voice: 'alice' }, 'Thank you. Goodbye!');
    twiml.hangup();
    res.set('Content-Type', 'text/xml');
    res.send(twiml.toString());
    } else {

    // Invalid input, redirect to welcome message

    const twiml = new twilio.twiml.VoiceResponse();
    twiml.redirect('/twiml');
    res.set('Content-Type', 'text/xml');
    res.send(twiml.toString());
    }

});
The /twiml endpoint prompts the caller to review products or reject the request. The caller's response is collected through DTMF tones and sent to the /handle-response endpoint. If the caller accepts, the server fetches the products and requests ratings for each one. If the caller declines, the call is terminated with a goodbye message. Incorrect input returns the caller to the /twiml endpoint.
Processing customer ratings and feedback
Now, we have routes that get user feedback and rating
app.post('/handle-rating', async (req, res) => {
    const { Digits, SpeechResult } = req.body;
    const { phoneNumber, productId } = req.query;
    let rating = Digits;
    let feedback ="";
if (SpeechResult) {
    const twilioClient = twilio();

    const recording = await twilioClient.api.v2010.accounts(process.env.TWILIO_ACCOUNT_SID).recordings(req.body.SpeechResult).fetch();

    if (recording && recording.transcription && recording.transcription.transcriptionText) {
        feedback = recording.transcription.transcriptionText;
    }
}

await reviewProduct(`/products/${productId}/reviews`, phoneNumber, rating, feedback);
    // Respond with an empty TwiML to end the call
    const twiml = new twilio.twiml.VoiceResponse();
    res.set('Content-Type', 'text/xml');
    res.send(twiml.toString());
});
The user's rating and comments for a particular product are sent to the /handle-rating endpoint. The phoneNumber and productId are taken out of the query parameters, together with the Digits and SpeechResult from the request body. The reviewProduct function is then called asynchronously to store the review data using the rating and feedback variables. Finally, the call is terminated by sending an empty TwiML VoiceResponse.
Creating a Secure Tunnel with Ngrok
Installing and configuring Ngrok
To use the webhook in our application, we must first install ngrok. Ngrok will provide us with a domain for hosting the webhook.
This is a screenshot of the Ngrok dashboard. Download and unpack Ngrok, then set up environment variables to allow you to execute it from the terminal.

You can now begin utilizing ngrok when you have finished setting up Ngrok and configuring it with your ngrok authentication key in the console.
Testing the secure tunnel functionality
Start ngrok and construct a tunnel to your localhost port 4000 by opening a new terminal and entering the following command.
ngrok http 4000
Ngrok has started HTTP tunnel forwarding to your local port 4000 where my webhook is being hosted.
Add Ngrok url to backend
Next, add the url from the ngrok terminal to the backend in order to make calls from your applicaton.
Navigate back to the orderController.js and add the ngrok url to the makeCall function call in the addOrderItems function.
await makeCall('', user.phoneNumber)
Testing of Application
Now is a great time to test out your application to see it in action.
Go to the homepage and order some products.

Now let’s go and re-order the product.

Now we can see that the review is already added.
What is next for your voice product review system
Now that you have added this cool whatsapp functionality to your ecommerce store, there are many other things that you can still do like deleting orders when a user does not confirm an order or creating an order for the user based on the prompt provided.
Additional resources
Twilio Voice - This page contains documentation on Twilio Voice.
TwiML - This page contains documentation on TwiML.
Twilio SDK for Node - The github repository contains Twilio Node SDK.
Taiwo Ola-Balogun is a Software Developer at ALX AFRICA. He is very passionate about javascript and bash and also enjoys building amazing software. He can be reached at taiwotriumphant [at] gmail.com.